Battery switch on travel trailer function is crucial for safe and efficient power management. Understanding how your battery switch works is key to preventing electrical issues and maximizing your RV’s battery life. This guide will walk you through the different types of switches, troubleshooting tips, and essential safety procedures to keep your travel trailer running smoothly.
From identifying the location of your switch to understanding its interaction with solar panels and inverters, we’ll cover everything you need to know to confidently manage your travel trailer’s power system. We’ll also explore the importance of regular maintenance to ensure the longevity and reliability of your battery switch.
Types of Battery Switches in Travel Trailers
Choosing the right battery switch for your travel trailer is crucial for managing your power system effectively and safely. Different types offer varying levels of control and complexity, each suited to different needs and setups. Understanding the options available will help you make an informed decision.
Battery switches act as the central control point for your trailer’s battery banks, allowing you to isolate or connect different batteries, preventing accidental drain and improving overall power management. This control is essential for managing both your house batteries (powering interior appliances) and your starting battery (for the tow vehicle’s engine).
Types of Battery Switches and Their Comparison
Several types of battery switches cater to various needs and budgets. The most common include single, dual, and rotary switches, each with its own set of advantages and disadvantages.
| Switch Type | Features | Installation Complexity | Cost |
|---|---|---|---|
| Single Battery Switch | Simple on/off control for a single battery. Often used for smaller trailers or as a supplementary switch. | Very easy; typically just two wires. | Low |
| Dual Battery Switch | Allows independent control of two batteries (e.g., house and starting). Common in trailers with larger power demands. | Moderate; requires careful wiring to ensure correct functionality. | Medium |
| Rotary Battery Switch | Offers multiple positions, allowing for different combinations of battery connections (e.g., both batteries combined, house battery only, starting battery only, all off). Provides the most control. | More complex; requires careful wiring and understanding of the switch’s positions. | High |
Internal Mechanisms of a Typical Battery Switch
Most battery switches, regardless of type, utilize a simple but effective mechanism. The core component is a set of heavy-duty contacts that are mechanically moved to connect or disconnect the battery circuits. In a dual battery switch, for example, these contacts are arranged to allow for independent control of each battery’s connection to the load. A rotary switch uses a rotating selector to switch between different contact combinations.
These switches are designed to handle the high currents involved in automotive and RV electrical systems, usually employing robust materials and construction to ensure reliable operation and safety. The switches typically use a spring-loaded mechanism to ensure positive contact and prevent arcing, which is crucial for safety and to avoid damage to the switch itself.
Battery Switch Location and Accessibility: Battery Switch On Travel Trailer Function
Finding your battery switch quickly is crucial, especially in emergencies or when performing routine maintenance. A poorly placed switch can add unnecessary stress and time to an already demanding situation. Proper placement ensures easy access and contributes to the overall safety and convenience of your RVing experience.The location of your battery switch depends heavily on the specific model of your travel trailer.
However, some common locations exist, and understanding these, along with the importance of accessibility, is key to safe and efficient operation.
So, you’re an audiophile who loves to travel? Awesome! First things first, check out this guide on building the perfect audiophile travel setup to ensure your listening pleasure isn’t compromised on the road. Then, before you jet off, remember to sort out your travel insurance; getting Aon travel insurance is a smart move for peace of mind, covering unexpected events and protecting your valuable gear.
Happy travels!
Typical Battery Switch Locations
Manufacturers generally place battery switches in easily accessible locations, though this isn’t always the case. Common spots include inside a dedicated compartment near the batteries themselves (often under a bed or in a storage bay), within the main electrical panel inside the trailer, or sometimes even externally, on the tongue of the trailer near the tow vehicle’s connection.
Some higher-end models might integrate the switch into a more sophisticated control panel. The key is to check your owner’s manual for the specific location in your travel trailer.
Importance of Easy Accessibility
Easy access to the battery switch is paramount for several reasons. During an emergency, such as a fire or electrical short, quickly disconnecting the batteries can prevent further damage or injury. Regular maintenance, including checking battery voltage and water levels (for flooded lead-acid batteries), also requires convenient access to the switch. A switch that’s difficult to reach will likely be neglected, leading to potential problems down the line.
Furthermore, easy access reduces the risk of accidental disconnection and ensures a smooth experience during routine checks.
Optimal Battery Switch Placement Diagram
Imagine a simple diagram: The trailer’s frame is shown, with the batteries located in a compartment towards the rear, under a bed for example. A dashed line shows the battery cables running from the batteries to a clearly marked switch. This switch is depicted inside a readily accessible compartment on the exterior wall of the trailer, near the main electrical panel, but not directly adjacent to the batteries themselves.
This placement allows for easy access without requiring crawling under the trailer or rummaging through cluttered storage spaces. The diagram should clearly illustrate a direct line of sight to the switch from the outside, avoiding obstructions and showcasing ample space around the switch for comfortable operation. The switch should also be clearly labeled, possibly with a bright color or high-contrast lettering.
So, you’re an audiophile who travels? Awesome! Check out this guide on building the perfect audiophile travel setup to ensure your listening experience remains top-notch wherever you go. And don’t forget about protecting yourself while you’re adventuring; securing Aon travel insurance is a smart move to cover any unexpected hiccups during your journey. Peace of mind is priceless, especially when you’re carrying around expensive audio gear!
In essence, the diagram visualizes a scenario where the switch is easily reachable, well-lit, and clearly identified, while still being relatively close to the battery location for minimizing cable length.
Connecting and Disconnecting Batteries Safely
Properly connecting and disconnecting your travel trailer batteries is crucial for safety and to prevent damage to your electrical system. Incorrect procedures can lead to sparks, short circuits, and even battery explosions, causing injury or significant damage to your RV. This section Artikels the correct steps to ensure a safe and efficient process.Connecting and disconnecting your batteries involves working with potentially dangerous electrical currents and corrosive battery acid.
Always prioritize safety by following the steps carefully. Failure to do so could result in serious injury or damage to your equipment.
Battery Connection Procedure
Before connecting your batteries, visually inspect them for any signs of damage, such as cracks, corrosion, or leaks. Ensure the battery terminals are clean and free from corrosion. Use a wire brush or battery terminal cleaner to remove any buildup. Wear safety glasses to protect your eyes from any potential splashing of acid. Once the terminals are clean, connect the positive (+) cable to the positive terminal and the negative (-) cable to the negative terminal, ensuring a tight connection.
If using a battery switch, ensure it’s in the “OFF” position before making any connections. Then, switch to the “ON” position.
Battery Disconnection Procedure, Battery switch on travel trailer function
To disconnect your batteries, first turn off any appliances or devices that are drawing power from the batteries. Then, switch the battery switch to the “OFF” position. This is crucial to prevent accidental short circuits. Always disconnect the negative (-) cable first, followed by the positive (+) cable. This minimizes the risk of sparks and accidental short circuits.
After disconnecting, store the cables safely to prevent damage or accidental contact.
Safety Precautions Checklist
It’s essential to have a checklist to ensure you’re following all safety procedures. Before beginning any battery work:
- Inspect batteries for damage.
- Wear safety glasses.
- Wear gloves to protect your hands from battery acid.
- Ensure adequate ventilation to prevent the buildup of potentially explosive hydrogen gas.
- Have baking soda and water on hand to neutralize any spilled battery acid.
- Have a fire extinguisher nearby.
During battery connection/disconnection:
- Ensure the battery switch is in the “OFF” position before connecting or disconnecting cables.
- Connect/disconnect cables firmly to avoid loose connections.
- Never allow metal tools to touch both terminals simultaneously.
- After connecting, check for any loose connections or sparks.
- After disconnecting, store cables safely and out of reach of children.
Potential Hazards of Incorrect Battery Connection/Disconnection
Incorrectly connecting or disconnecting batteries can lead to several hazards, including:
- Sparks and fire: Loose connections or reversed polarity can create sparks that ignite flammable materials.
- Battery explosion: Hydrogen gas buildup can cause batteries to explode if a spark is present.
- Short circuits: Incorrect connections can create short circuits, potentially damaging electrical components.
- Acid burns: Spilled battery acid can cause serious burns to skin and eyes.
- Electrical shock: Incorrect handling can lead to electrical shocks.
Impact of Battery Switch on Electrical System

The battery switch in your travel trailer acts as the central control for your electrical system, determining which batteries power your appliances and lights. Understanding its function is crucial for safe and efficient operation of your RV. It essentially manages the flow of power, preventing accidental drain and allowing you to selectively use different power sources.The battery switch directly affects the flow of electricity by either connecting or disconnecting your house batteries from the rest of the trailer’s electrical system.
When the switch is in the “on” position, electricity from your house batteries can flow freely to power your lights, appliances, and other 12-volt devices. When the switch is “off,” this flow is interrupted, preventing any drain on your batteries. This is especially important when your trailer is stored for extended periods, preventing a completely drained battery. Furthermore, the switch often manages the connection between your house batteries and the chassis battery (used for starting your tow vehicle).
Power Distribution Between House and Chassis Batteries
A properly functioning battery switch enables selective power distribution. This means you can choose to power your trailer’s internal systems solely from your house batteries, or you can isolate them completely. Many switches also offer a “combined” or “both” position, allowing you to charge your house batteries from the chassis battery while the engine is running, using the alternator as a power source.
This is a common setup to keep your house batteries topped off during travel. Without a functioning switch, this controlled distribution is lost; you might unintentionally drain your house batteries while driving, or be unable to charge them effectively.
Electrical Performance Comparison: Switch On vs. Switch Off
With the battery switch in the “on” position, your travel trailer’s 12-volt system operates normally, drawing power from the house batteries to run all connected appliances and lighting. This assumes, of course, that your batteries are adequately charged. The lights will illuminate, the water pump will function, and other 12-volt devices will work as designed. In contrast, with the switch in the “off” position, all power to these systems is cut, preventing any discharge of your house batteries.
This is the ideal state for long-term storage. Attempting to operate 12-volt systems with the switch off will result in nothing happening; the circuit is completely broken. The only exception would be systems directly powered by an external source, like shore power.
Integration with Solar Panels and Inverters
A battery switch plays a crucial role in managing power flow when you integrate solar panels and an inverter into your travel trailer’s electrical system. Understanding this interaction is key to maximizing your off-grid capabilities and protecting your equipment. Essentially, the switch acts as a gatekeeper, controlling whether power from your solar panels and/or your batteries can reach your inverter and, ultimately, your appliances.The battery switch allows you to isolate your house batteries from the charging sources (like your solar panels and alternator) or from your loads (inverter, lights, appliances).
This isolation is vital for safety and system maintenance. For example, if you have a problem with your solar charge controller, you can isolate the solar panels from the batteries using the switch, preventing potential damage. Similarly, if you need to work on your batteries, disconnecting them completely through the switch is a critical safety precaution. Having a properly configured system with a functional battery switch can also extend the lifespan of your batteries and other components by reducing the chance of overcharging or short circuits.
Solar Panel Integration
Solar panels generate DC (direct current) electricity. This DC power is usually routed through a solar charge controller, which regulates the voltage and prevents overcharging of your batteries. The charge controller then connects to your house batteries. The battery switch sits between the batteries and the rest of your DC system. When the switch is ON, the solar-charged batteries can power your DC appliances directly.
When OFF, the solar panels still charge the batteries, but the batteries are isolated from the rest of the DC system. This means you’re not drawing power from your batteries, only charging them.
Inverter Interaction
Your inverter converts the DC power from your batteries into AC (alternating current) power, which is what most household appliances require. The battery switch controls whether your inverter can draw power from your batteries. With the switch ON, your inverter can use the battery power to run AC appliances. If the switch is OFF, the inverter is powerless and won’t be able to operate, protecting your batteries from accidental discharge.
It’s important to note that many inverters also have their own on/off switches, providing an additional layer of control.
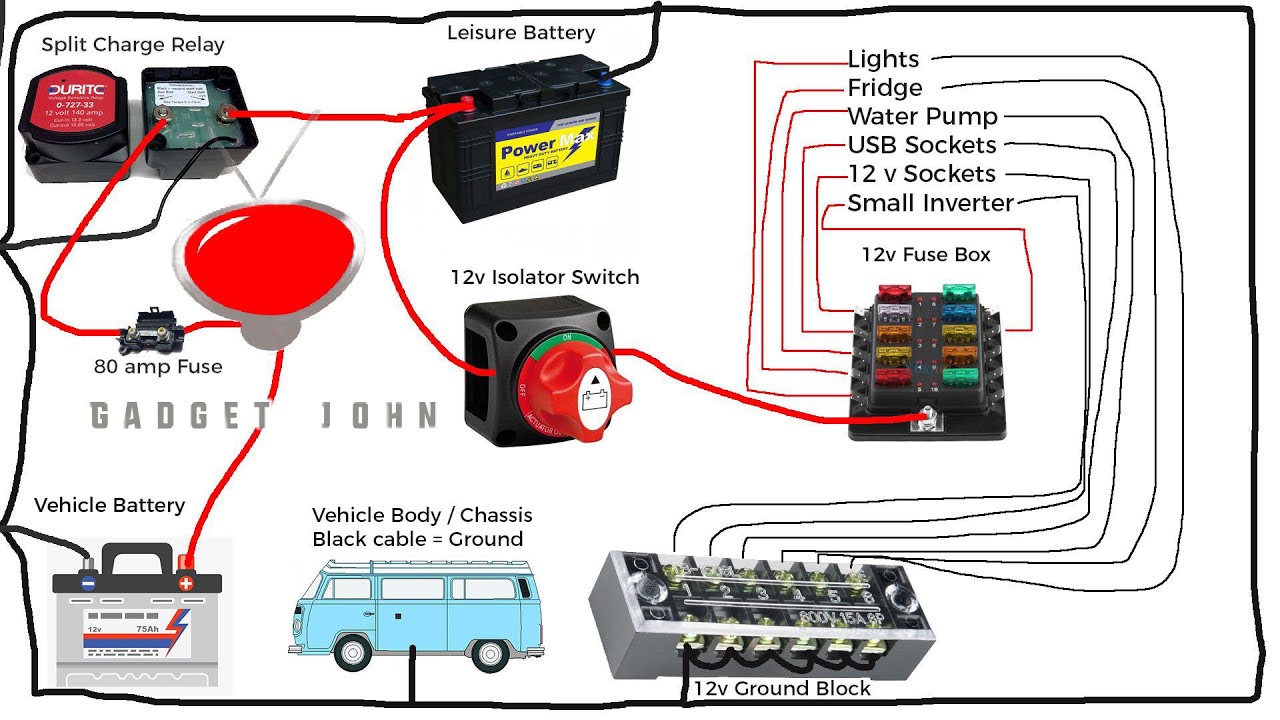
Simplified Schematic Diagram
Imagine a simple diagram. At the top, you have your solar panels connected to a solar charge controller. The output of the charge controller connects to one side of the battery switch. Your house batteries are connected to the other side of the battery switch. From the battery switch, you have two main outgoing connections: one to your DC distribution panel (powering lights, fans, etc.), and another to your inverter.
The inverter, in turn, provides AC power to your AC appliances. The battery switch acts as the central control point, allowing you to disconnect the batteries from both the charging system and the loads. This provides a safe and controlled environment for managing your power system.
Mastering your travel trailer’s battery switch is about more than just turning power on and off; it’s about understanding your RV’s electrical system and ensuring safe, reliable operation. By following the safety guidelines, performing regular maintenance, and understanding the different types of switches available, you can confidently manage your power and extend the life of your battery system. Happy travels!
Q&A
What happens if my battery switch is faulty?
A faulty switch can lead to power loss, inconsistent power supply, or even electrical damage. You might experience issues with lights, appliances, or your charging system.
How often should I clean my battery switch?
At least twice a year, or more often in humid climates, clean the switch terminals with a wire brush and baking soda solution to remove corrosion.
Can I use any type of cleaner on my battery switch?
No, avoid harsh chemicals. A baking soda and water solution is generally safe. Always disconnect the battery before cleaning.
How do I know which battery switch I have?
Check the switch itself for markings or consult your RV’s manual. Common types include single, dual, and rotary switches.
What’s the difference between a single and dual battery switch?
A single switch controls one battery bank, while a dual switch allows separate control of two battery banks (e.g., house and chassis batteries).
